hot air brush

Professional Blow-out from Home featuring: Revlon and John Frieda

Do you need help on those days you have to do something extra to your hair, those days where air drying just isn’t good enough? Well, look no further, I’m here to help! If you’re similar to me and have frizzy hair (& want a modicum of control) these 2 hot air brushes work wonders.

First up, for all my long hair divas, is the Revlon hot air brush.

Revlon

Per Amazon: The Revlon one-step hair dryer and volumizer is a designed hot air brush to deliver gorgeous volume and brilliant shine in a single step. The unique Oval brush design smooth hair while the rounded edges quickly create volume at the root and beautifully full-bodied bends at the ends in a single pass, for salon blowouts at home. The brush is designed with nylon pin and tufted bristles for detangling, improve volume and control. Styling flexibility is guaranteed with 3 heat/speed settings and a cool option. Built to provide just the right amount of heat. Unlike conventional hair dryers, this volumizer can be placed closer to the scalp for lift. 

https://smile.amazon.com/Revlon-One-Step-Dryer-Volumizer-Brush/dp/B08GC5FB1N/ref=sr_1_1_sspa?crid=1BUSGT2SG52TW&dchild=1&keywords=revlon+one+step+hair+dryer+and+styler+volumizer&qid=1609610758&sprefix=revlon+%2Caps%2C198&sr=8-1-spons&psc=1&spLa=ZW5jcnlwdGVkUXVhbGlmaWVyPUExS1E5RlBMNFVaNDZTJmVuY3J5cHRlZElkPUEwMTM5OTk5M1ZVQTdYTDMwUlJKSCZlbmNyeXB0ZWRBZElkPUEwMjUwMDkzMUhGUkdLNFc5VDNZUCZ3aWRnZXROYW1lPXNwX2F0ZiZhY3Rpb249Y2xpY2tSZWRpcmVjdCZkb05vdExvZ0NsaWNrPXRydWU=

This brush has been a game changer for me, in that it gives me a beautiful blow-out from home. Going to the Drybar isn’t always an option, so it’s nice to have a hot air brush, at home, that does all the work for me.

The Pros are listed below:

  1. Great volume
  2. Less frizz
  3. Shine
  4. Better hair dryer than a blow dryer

Cons are listed below:

  1. Long drying time
  2. Can get super hot

All in all, I feel this product is well worth the $60 price tag.

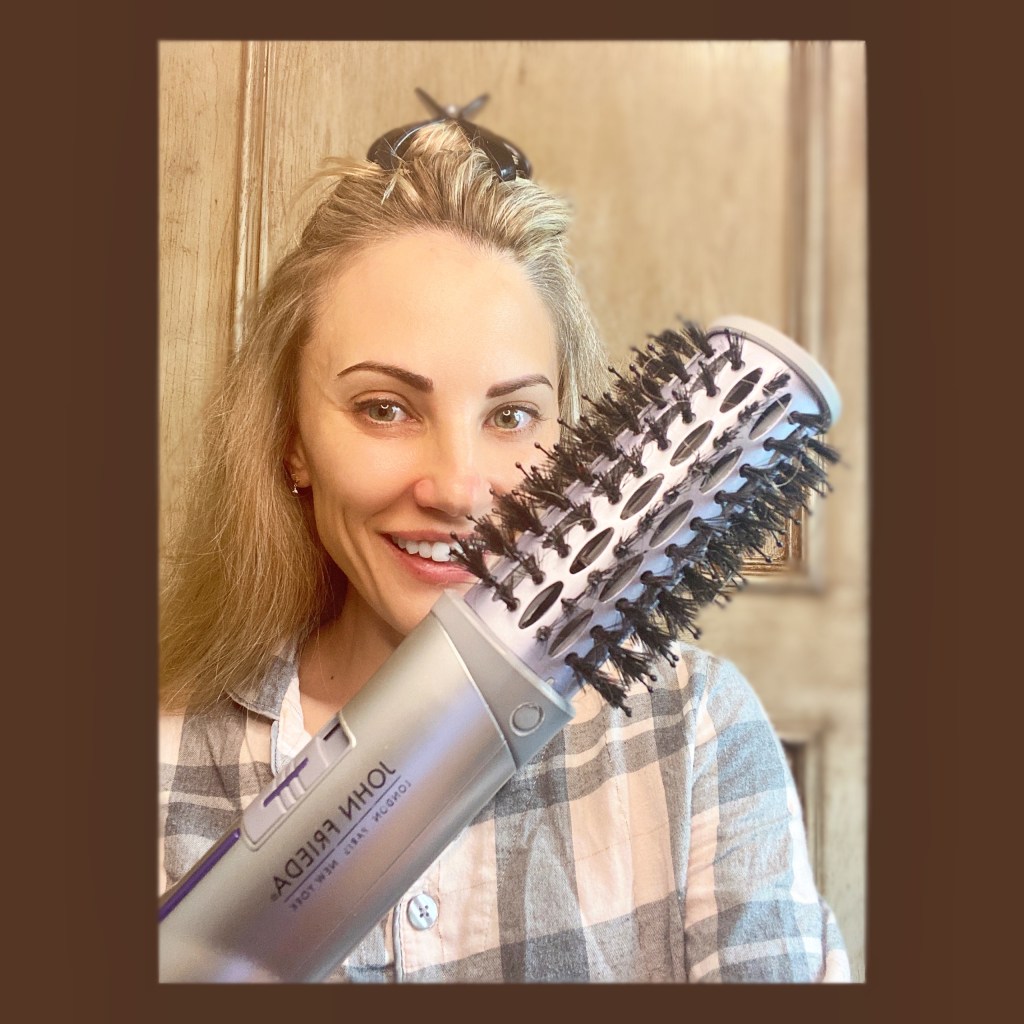
Now for all my shorter hair gals, I have another option for you!

I like the John Frieda hot air brush. It’s smaller, gives you more control, curl, and it’s not as large or clunky.

Per Amazon:
Transform your hair with the new hot air brush from the experts at john Frieda. This premium hot air brush features advanced ionic power and gives volume and shine to your hair while it simultaneously dries each strand. Instant heat up makes drying fast and safe all while delivering high heat. It’s convenient and easy to use.

https://smile.amazon.com/John-Frieda-Salon-Shape-Brush/dp/B00YPBP3RU/ref=sr_1_5?dchild=1&keywords=john+frieda+hot+air+brush&qid=1609611917&sr=8-5

It does the same thing as the Revlon brush, just in a smaller version. I have both, but because my hair is so thick, I tend to grab the Revlon brush more. If you have a bob or shoulder length hair, I would recommend the John Frieda. A great deal, for less than $40.

John Frieda

If you end up trying these brushes, let me know what you think. I’m interested to hear your thoughts. As always, I hope this information helps you on your journey to feeling and looking your best!

You can purchase these items here: http://www.amazon.com/shop/alisonviktorin

All About Brows

Microshading/Microblading

Just do it! Hahaha! If you’ve been on the fence about getting your brows microbladed or shaded, I’m here to tell you…it’s worth it.

First, let me give you a definition from healthline.com: Microshading is a procedure where a cosmetic technician applies semipermanent makeup to your eyebrows. It’s a type of cosmetic tattoo procedure. Using pigment ink and a handheld tool, the technician places tiny, pin-like dots over the brow area to fill in thin spots.

My brow journey started because my left eyebrow is higher than my right. Whenever I wear sunglasses my left eyebrow played peek-a-boo with the rim…It’s like Hey World, do you see me?! Ugh, so frustrating. So, I started getting them waxed, to help shape them and make them look at least, related. This didn’t work, so I started getting botox to bring my right side up to my left. This worked better, but I was still self-conscious, when the ‘tox started wearing off. In came Brow Lamination, this will be another blog post. The BL got me used to growing out my brows and seeing what they’d look like with more oomph. The problem was the price, I was spending over $100 every 4 wks and that was adding up, sooooo…

Cut to me looking at more permanent solutions, which led me to Microshading. Many moons ago, I worked in a Maintenance Dept. of a school and a coworker had shaved off her brows and tattooed new ones turned green…looked like prison brows, no joke! This was my only reference of “tattooed brows.” So, I was quite concerned as I started my research. Let’s just say the art of tattooing has come a looooooong way and I promise your brows won’t turn green or look like you got them done in a prison yard. Lol!

To find your perfect artist…google is your friend, word of mouth, and insta/Facebook for pix. Look closely at the artist’s pictures. If you like their work, you will see every brow (that they’ve done) and think how great it looks. Every artist has different styles: some like heavy, thick brows and some are more delicate. The price can be anywhere from $500-$800. Some will give you a touch-up included in the initial price and some won’t.

The procedure itself takes a couple of hours and does not hurt. They numb you before they begin. My brow artist was able to make my girls pretty even after all these years! I am thrilled! No more peek-a-boo with my sunnies. The week after the treatment, your brows will be itchy and flaky. Do not get them get soggy wet for about 4 days and moisturize, moisturize, moisturize. My brows started out a reddish color, but have settled to a nice brown. Below I will show you some pix.

This is how they look now (8 wks out). I have 1 more week before I get my touchup. This pic makes me happy because I’m not doing anything to my face at all…before I got the micro shading I always made sure I raised my right eyebrow, so it wouldn’t look too different from my left. Or I made sure to tilt my head juuuust right, so the different height wouldn’t be quite so noticeable. I’m tired just rereading all the different smoke and mirror tricks I was trying, geez.

I hope this was helpful and if you’ve been on the fence, I say jump off and get some Microshading! It’s worth it.

Updated Video

I just wanted to show you what it looks like to get your brows done and the after effects.

Beauty on a budget

Part 1

Have you ever thought about going to a Med Spa to get Microneedling? Microneedling, in laymen’s terms, is a device with multiple, skinny needles that puncture the skin and help to rebuild collagen. Once your skin peels and heals, you will have plumper/glowier skin. It’s supposed to help with acne scarring and fine lines, as well. An all around great age defy-er. But, not everyone has $2-300 to spend on this procedure every month…

*Click on the link https://smile.amazon.com/Dr-Pen-Ultima-Professional-Microneedling/dp/B0822PJ8NS/ref=sr_1_27?crid=2C9R1RVUDBFVQ&dchild=1&keywords=dr.+pen+microneedling&qid=1605108980&sprefix=dr.+pen%2Caps%2C269&sr=8-27 to go straight to the product page.

In comes Dr. Pen. An at-home microneedling device that works really well!

Tip: I use a Tranexamic Acid serum (because Melasma, ew) on each section of my face, then microneedle over the serum, so I get MAXIMUM soak-in benefits. Also, I find that doing it this way, doesn’t cause the needle to drag across my skin…using the serum, lets the needles glide much smoother across the delicate skin of your face.

The Serum I use.
https://smile.amazon.com/Tranexamic-Vitamin-Treatment-Whitening-Dearskin/dp/B07RYJ919Z/ref=sxts_sxwds-bia-wc-p13n1_0?crid=2YDD4MHWH916U&cv_ct_cx=tranexamic+acid&dchild=1&keywords=tranexamic+acid&pd_rd_i=B07RYJ919Z&pd_rd_r=3c0f46c3-d82e-40ed-978e-61d72005d01d&pd_rd_w=uMbAF&pd_rd_wg=HhgAw&pf_rd_p=f4ebc3ce-c45d-4b03-a3e4-a17c876358c0&pf_rd_r=9TV4APFJ2BDWTE2BB3YR&psc=1&qid=1605108717&sprefix=tranex%2Caps%2C202&sr=1-1-80ba0e26-a1cd-4e7b-87a0-a2ffae3a273c

Basically, you can be all in for under $200, saving hundreds by doing this in the privacy of your own home. Now, you’re not going to get all the massaging, candles, aromatherapy–basic pampering you’d get from a spa, but if you’re on a budget (who isn’t) this is a fantastic route to take, with very similar results.

One last tip…if you have a low pain tolerance, you can also get a roll-on Lidocaine. Just roll it all over your face, wait a couple of minutes and voila…a pain free microneedling session!

Pain Free
https://smile.amazon.com/Maxocaine-Lidocaine-Vanishing-Registered-Addictive/dp/B078X4PLD5/ref=sxts_sxwds-bia-wc-p13n1_0?crid=S20K9JJ0NSTC&cv_ct_cx=maxocaine+roll+on&dchild=1&keywords=maxocaine+roll+on&pd_rd_i=B078X4PLD5&pd_rd_r=3189f441-85e1-4166-9ea3-67ac4e3c1e92&pd_rd_w=yuXQy&pd_rd_wg=FK0r4&pf_rd_p=f4ebc3ce-c45d-4b03-a3e4-a17c876358c0&pf_rd_r=0Y8FKWGJN79Z3PX2HKS1&psc=1&qid=1605108859&sprefix=maxocaine%2Cbeauty%2C173&sr=1-1-80ba0e26-a1cd-4e7b-87a0-a2ffae3a273c

Let me know what you think! I think it’s worth a try.

This is for all my Visual Friends out there…I wanted to show you what the Microneedling Pen and the serum look like in action. Enjoy!

You can purchase these items here: http://www.amazon.com/shop/alisonviktorin

Comparing Sunscreen

First, let me say I love most products from Skinbetter Science…the sunscreen, not so much. This is called Tone Smart, $55, and spf 68. The reasons I dislike this product are because it’s drying, it doesn’t protect me as much as I’d like, and the price is too high for not delivering.

I do like the compact, though.

A helpful tip is to use your fingers to rub it in instead of the provided sponge, that way you will use less product.

Currently, I am loving Make P:rem sunscreen. It’s about $30 and is spf 50. I like the magical, cooling effect it has. I like that it doesn’t leave my skin white. I’m really liking the dewy, plumped look it gives my skin.

https://smile.amazon.com/MAKEP-Defense-Moisture-Whamisa-MAKEPREM/dp/B074JVHCL1/ref=sr_1_5?crid=1UYDWDWFB20B4&dchild=1&keywords=makeprem+uv+defense+me+moisture+sun+cream+spf50+pa&qid=1605109787&sprefix=makeprem%2Caps%2C229&sr=8-5

This is the game changer tip…I combine the sunscreen with this whipped, mousse goodness to give my skin a nice matte, blurred finish. You will love the texture. Combining these two products gives me the moisture I need with the blurred lines and protection that I love.

*Click on each image to go directly to the product page or the link below.

https://smile.amazon.com/Roche-Posay-Effaclar-Blur-SPF-1-01/dp/B00TBJWPRC/ref=sr_1_1?crid=4W1QA468OESZ&dchild=1&keywords=laroche-posay+bb+blur&qid=1605109659&sprefix=laroche-posay+bb%2Caps%2C596&sr=8-1

Just wanted to show you what the products look like on my skin.

You can purchase these items here: http://www.amazon.com/shop/alisonviktorin

Let’s talk about it…Melasma

My Melasma journey has taken place for a couple of years now. I did not get this dread condition after having a baby, it came from lasers…oh yes, lasers can give you melasma. Who knew?

I have tried everything under the sun for this condition, to no avail. I now have some tried and true tricks to share with you!

1.Buy a peel from Amazon. I suggest a glycolic acid peel. Use it every couple of weeks.

2.Gators: Not a good look, but effective. I chose the full face covering + a hat. I looked like a crazy person, but who cares when you’re trying to protect yourself.

3. Tri-Luma is a whitening cream from the dermatologist with hydroquinone. This works, buuuut, you can only use it for 3-6 months and then you have to take a break for another 3 months. Not ideal.

Drum roll please….

TRANEXAMIC ACID, in pill form, is the GAME CHANGER. You can only get it from the dermatologist, and I’m here to tell you I don’t have to wear a burkha outside anymore! There are some side effects, blood clots can occur…this is why you must be under a doctor’s supervision.

There you go my friends…I hope you can benefit from this tip, like I have.